|
|
Home
creative
things
|
 |
| |
|
research and facts
|
|
| |
|
images and misc
|
|
| |
|
archives of long ago
|
|
| |
|
|
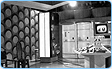
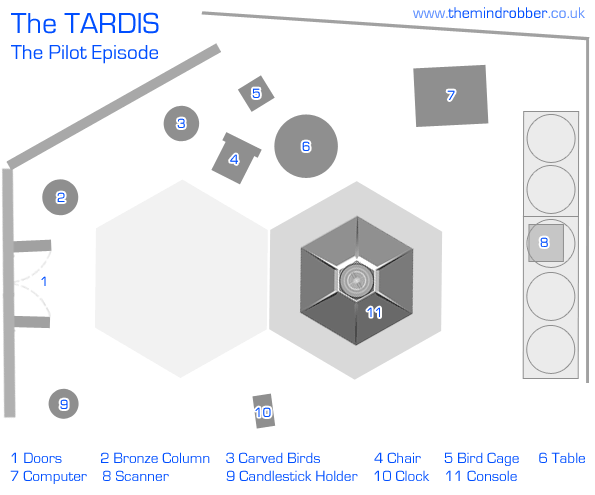
We start in 1963 and the man responsible for it all: Peter Brachacki. His vision created the look which perseveres to the present day. The TARDIS control room was large, and futuristic, with a central, hexagonal console and glass column. The walls are adorned with roundels. This simple formula never changed, but almost everything else did.
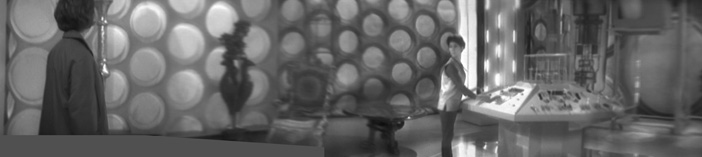
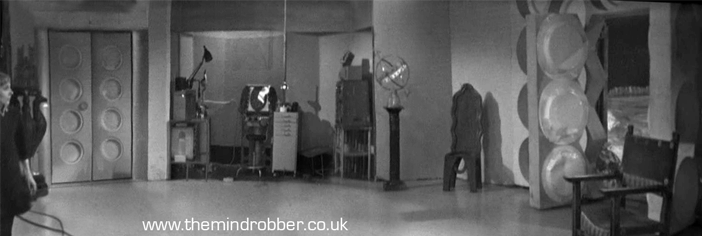
Above is a panoramic view of the first console room, although technically not canonical as this is how it appears in the unbroadcast pilot episode. The only major difference between this earliest version and the one which survived the tweaks into the broadcast version was that the right-hand wall was originally a painted backdrop featuring cyclindrical machinery encased in perspex which continued the piston-like theme of the central column of the console.  These 2-dimensional technological elements sat behind a movable wheeled framework which housed the TARDIS monitor. Part of this painting can be seen on the right. Also incorporated into this backdrop were over-sized versions of the round shapes which adorned the rest of the ship. These 2-dimensional technological elements sat behind a movable wheeled framework which housed the TARDIS monitor. Part of this painting can be seen on the right. Also incorporated into this backdrop were over-sized versions of the round shapes which adorned the rest of the ship.
 The left hand side of the room featured two honeycombe walls at 120 degrees to each other, which lined up with a hexagon on the floor that surrounded the central console. The round recesses of these walls were each filled with pressed plastic moudlings which were opaque and backlit. These created an extra feeling of light and depth in the room. The left hand side of the room featured two honeycombe walls at 120 degrees to each other, which lined up with a hexagon on the floor that surrounded the central console. The round recesses of these walls were each filled with pressed plastic moudlings which were opaque and backlit. These created an extra feeling of light and depth in the room.
The rear central wall of the room was a photographic blowup. This section of roundels was printed on a very long, rolled sheet whose folds and creases could often be seen.
The photographic wall did not line up parallel with the honeycombe to its left, therefore creating a concealed exit to the back of the room. This gap in the wall sections, and the creased fabric of the photographic blow-up, can be seen on the photo above left.
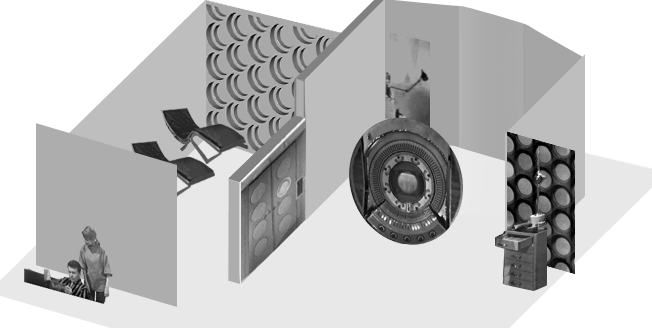
From above, hung a hexagonal canopy with a circular central section. This was inclined so that the underneath was visible to the camera and, contrary to popular belief, was not suspended over the console itself but positioned towards the door and helped to obscure some of the studio ceiling. Below is floor-plan for the TARDIS seen in the pilot episode. For reference in the rest of this article, I am going to refer to the top of these pictures as 'north', with the television cameras usually occupying the 'south' wall area (i.e. what you might term 'the fourth wall' in post-modernist television terms), the scanner scaffold to the east and the external doors to the west.
The First Control Room
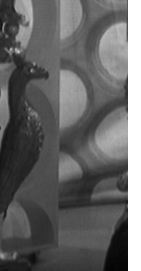
The pilot design remained largely the same into the broadcast version
of An Unearthly Child. The antique column, clock and wooden bird
sculpture survived, but the ornate chair was replaced by a simpler director's-chair
type, plus a carved wooden chair with a tall back was added. The floor
hexagons and ceiling canopy survived, as did the gap between the walls
at the back of the set.
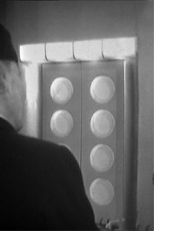
 The photographic blowups of the roundels survived but were backed properly
so that the fabric didn't wrinkle up or sag onto the studio floor. The photographic blowups of the roundels survived but were backed properly
so that the fabric didn't wrinkle up or sag onto the studio floor.
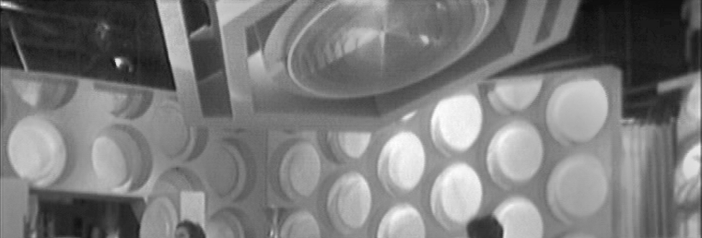
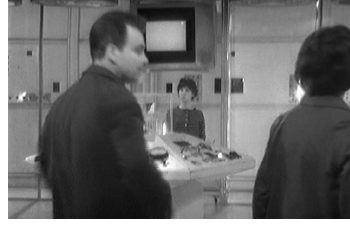
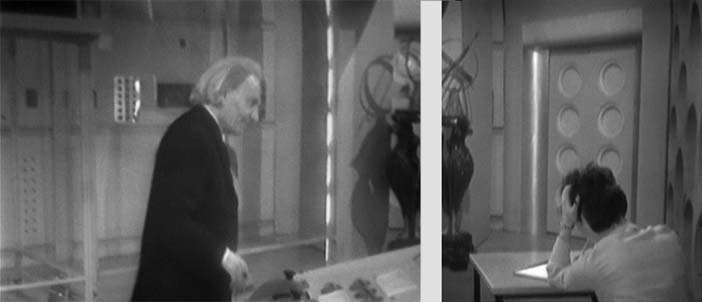
The main design change was the painted machinery backdrop behind the scanner
framework was replaced with a proper wall. This "computer bank"
was divided into a grid and adorned with a variety of flashing lights
and can be seen in the above screen shot.
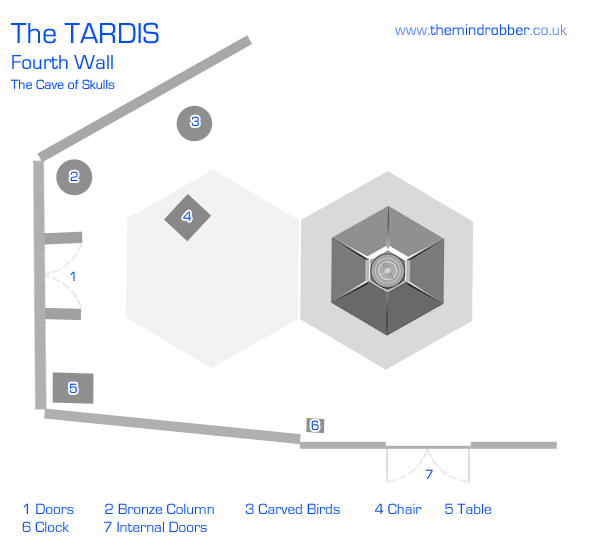
The Fourth Wall
 Today it is easy to think that the external doors of the ship have always been depicted on the left as we view the control room but, back in the 60s, the viewer was as likely to see the doors at the back of the room (as in The Keys of Marinus) or on the right (as in The Sensorites or The Web Planet). After the intial three adventures it became rare to see more than a small section of the room at the start or finish of each story. Today it is easy to think that the external doors of the ship have always been depicted on the left as we view the control room but, back in the 60s, the viewer was as likely to see the doors at the back of the room (as in The Keys of Marinus) or on the right (as in The Sensorites or The Web Planet). After the intial three adventures it became rare to see more than a small section of the room at the start or finish of each story.
To increase our understanding of this early TARDIS console room layout, we look to the episode The Cave of Skulls in which the viewer is given the first reverse angle looking towards where the cameras normally stand.
We see the external doors off to the right
and a section of roundels where we would normally have the "fourth
wall".
The bronze column and director's chair have mysteriously moved during the ship's first flight, and we can see there is a table to the left of the external doors (as you walk out) where
the Doctor leaves his jacket, satchel and things. To the left of the table, there is a blank section of wall and a set of internal double doors with an illuminated lintel. It would never be seen illuminated again!
 Is the TARDIS broken or is the Doctor not capable of working it? During a conversation at the end of their first adventure, the Doctor confesses he can't really
steer the machine, although Susan insists that he can, but they just took
off too quickly. Is the TARDIS broken or is the Doctor not capable of working it? During a conversation at the end of their first adventure, the Doctor confesses he can't really
steer the machine, although Susan insists that he can, but they just took
off too quickly.
This early TARDIS console is also adorned with English words and numbers. We see a meter which shows
"radiation" and in the following story the words "FAST RETURN" can be seen written in felt tip..
Additional Internal Doors and Some Changes
Despite the establishment of the above, there was inconsistency in the layout as areas of the set were rejigged slightly.In the second story, The Dead Planet, the 'fourth wall' is further added to as we are shown a view of the 'south east' corner of the room (normally off to the immediate right of the camera). We see a second computer bank and the
clock which tends to hop around, perhaps due to the mystical quirks
of space/time travel. The three birds sculpture (now with a new top piece) has also relocated to this
part of the room, guarding the entrance to the scaffold which houses the
scanner.
The scanner screen's scaffold is shown to be a perspex ante-chamber
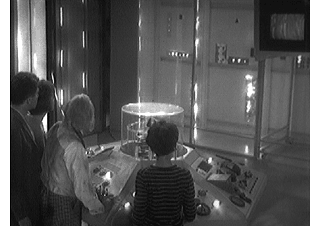
which a person can run behind to reach the computer that includes
the Fault Locator. This corner of
the room includes a table where Susans sits and draws, however the wall to her right (see above photo) is actually the external doors. If we wanted to believe a unified floor-plan for the console room, we'd have to take these to be an alternative set of outside doors, or perhaps they're an unusually robust set of internal doors. This corner of the control room also includes the food machine.
The Living Quarters and other Rooms
 The Edge of Destruction is our first opportunity to see more of the ship than just the control room. The south east corner of the room is now shown to be different, and in this story features a set of internal doors at 90 degrees to the scanner scaffold. To the right of the doors is a section of scaffold like that which houses the scanner but with opaque panels, and then the south wall is continued in the form of some kind of corrugated or folded screen. Through the internal doors are the living quarters. The Edge of Destruction is our first opportunity to see more of the ship than just the control room. The south east corner of the room is now shown to be different, and in this story features a set of internal doors at 90 degrees to the scanner scaffold. To the right of the doors is a section of scaffold like that which houses the scanner but with opaque panels, and then the south wall is continued in the form of some kind of corrugated or folded screen. Through the internal doors are the living quarters.
The food machine (which had previously been in the main control room) is now in a lounge area which also has a couch and a round table. Curiously (I use the word with perverted understatment) the lounge area is separated from what is seemingly the girls' bedroom only by a 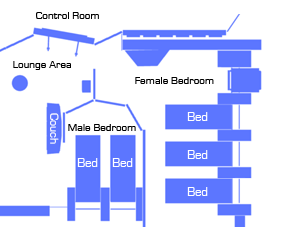 transparent screen, and no door. The ergonomic beds in which we assume Barbara and Susan sleep fold down from the wall, and anyone getting undressed for bed would be visible as soon as you walk in the lounge. Behind the couch is the boys' bedroom, which has two more ergonimic beds in plain view. The TARDIS was apparently not designed with privacy in mind. transparent screen, and no door. The ergonomic beds in which we assume Barbara and Susan sleep fold down from the wall, and anyone getting undressed for bed would be visible as soon as you walk in the lounge. Behind the couch is the boys' bedroom, which has two more ergonimic beds in plain view. The TARDIS was apparently not designed with privacy in mind.
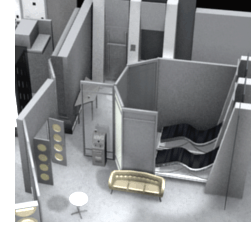
The fantasic 3D model by Andrew Orton above shows the living area and to the left is his floor plan of this section of the TARDIS. Aside from a mention of an 'extensive wardrobe' there was no suggestion that the ship contained any areas other than the control room and the living quarters.
The subsequent stories of Season One added nothing else to our knowledge of the TARDIS interior, with the likes of The Keys of Marinus starting the tradition of just using the bare minimum of set to record a TARDIS scene. The Sensorites showed the external doors on the right of the room and reverted the south wall back to how it was seen in The Cave of Skulls. Also of note in that story is a fantastic shot in which the camera follows our heroes out into the TARDIS, although it does sadly reveal the wooden framework of the spaceship set backing onto the TARDIS walls.
You have got the picture already that the TARDIS has never had a consistent layout. Although the first three stories contradicted each other, the layout of the control room was roughly consistent for the first season and a half. Thereafter, it became a free-for-all.
Half way into season two, The Web Planet shows a completely new 'south wall'. Between the sleeping quarters and the external doors, there are now two little alcove storage areas full of equipment including: an Astral Map, an angle-poise lamp, a door control somehow powered by the Doctor's ring, and a first aid kit.
Two stories later we glimpse the TARDIS wardrobe, which apparently ajoins the control room, or is at least within ear-shot of someone standing at the console. It isn't really possible to put a fix on this room, since its location is made deliberately obscure. 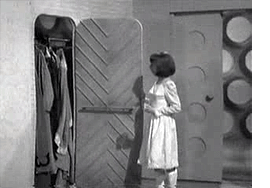 First thing to note is that the wall and door of the TARDIS wardrobe are reused sections of set from the Dido ship from which Vicki was rescued in The Rescue four stories earlier! The door is so distinctive it's a wonder Vicki doesn't point this out when she sees it! First thing to note is that the wall and door of the TARDIS wardrobe are reused sections of set from the Dido ship from which Vicki was rescued in The Rescue four stories earlier! The door is so distinctive it's a wonder Vicki doesn't point this out when she sees it!
When Vicki leaves the wardrobe area, she walks through a pair of double-doors and turns right to go to the food machine; a device previously located in the living quarters. Whilst it would appear she's just in the corner of the TARDIS control room, the Doctor and the others never take their eyes of the scanner, even when she smashes a glass, so we assume this all takes place in a different next room.
Next, and no less bizarre, is The Chase. A story whose budgetary limitations are made manifest in the TARDIS interior as throughout the rest of the story.
The Chase once again plays fast and loose with the layout. We see the Doctor tinkering with the Space/Time Visualiser in workshop of some kind. At the back of this area are some instruments and an angle-poise lamp, and to the right is a set of draws with the photographic roundel wall behind. Vicki exits through a set of doors to the left and finds Ian in the living quarters.
However, when Vicki walks to the right-hand edge of Ian's room, not only can we see straight through into Barbara's room but also the angle-poise lamp in the background - And it becomes apparent we are looking edge-on at the dividing wall and door between the workshop and the living quarters. This view makes a mockery of the fact that she and Ian enter and leave the workshop through the doors, when in fact they could have just walked around them where the wall is wide open!
In the adjoining room where Barbara is, we have a new section of the living quarters with a proper wall of roundels and two of the unfolding ergonomic beds.
The proper TARDIS walls originally all had molded plastic bowls affixed to the rear of each hole, but as the series wore on they became increasingly damaged. They are in a poor state in The Space Museum and so unsurprisingly in The Chase the decision was made to remove the bowls and have a flat backing piece.
These 'flat-back' roundels can be seen for the first time behind Barbara as she sits on the floor.
With studio space and roundel walls dedicated to the workshop and living areas, the TARDIS console was not used for episode one, and William Hartnell mimes the flicking of switches unconvincingly with the canopy in the background.
The exploration of the TARDIS set continues in Part 2.
|
|
         |